Table of Contents
1. 建立專案環境
可以先參考【 Node.js 】如何在 Node.js 中建立 TypeScript 的環境
1.1 建立專案資料夾
mkdir GraphQL-with-TypeScript1.2 初始化專案
cd GraphQL-with-TypeScriptnpm init1.3 安裝相關套件
npm install --save graphql apollo-server typescript @types/node nodemon ts-node1.4 初始化 TypeScript
tsc --init如果遇到 error ,請參考:【 Node.js 】如何在 Node.js 中建立 TypeScript 的環境
1.5 新增進入點檔案並修改 package.json
新增 src 資料夾,並新增一個 server.ts 作為進入點檔案。
mkdir srctouch src/server.ts修改 package.json ,將 “main” 欄位改為進入點檔案的位置,並修改 “script” ,設定 nodemon 的進入點檔案。
// package.json
{
  ...
  "main": "src/server.ts",
  "scripts": {
    "start": "nodemon src/server.ts",
    "test": "echo \"Error: no test specified\" && exit 1"
  },
  ...
}
nodemon 是開發 Node.js 時常用的套件,每當有檔案儲存時, nodemon 就會自動重啟 server,讓你可以即時看到修改的 code 產成什麼樣的影響。
1.6 測試是否成功
先新增以下程式到 src/server.ts 裡:
// src/server.ts
console.log('Works!!')
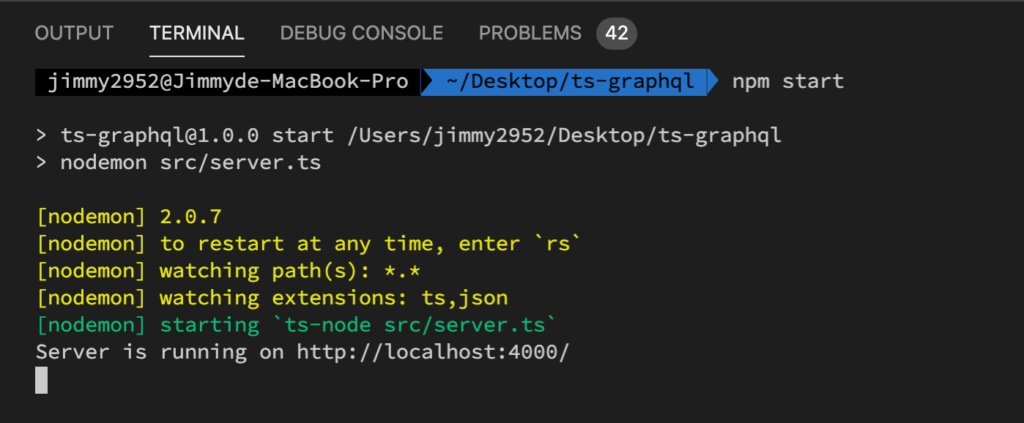
在終端機輸入:
npm start成功的話,在終端機會顯示以下畫面:
2. 用 TypeScript 寫一個 Apollo server
Apollo 是用來處理 GraphQL 的一個套件,裡面包含了許多開發 GraphQL 會用到的工具。
2.1 建立 schema
在建立 Apollo Server 之前得先建立 GraphQL 的 schema,通常會習慣將 schema 另開一個資料夾,並將所有 GraphQL 的 schema 都寫在這個資料夾,以便專案變大時方便管理。
mkdir src/schema
touch src/schema/schema.graphql
GraphQL 的 schema 都是以 graphql 為副檔名:
# src/schema/schema.graphql
type Query {
  users: String
  # 當 query 的 field 是 users 時,Apollo 回傳的response data 型別為 string
}
2.2 建立 resolvers
resolvers 是用來告訴 Apollo Server 當 GraphQL 的 request 傳進來 server 時, Apollo Server 應該回傳什麼樣的 response data,通常也會新增一個資料夾用來放所有的 resolvers:
mkdir src/resolvers
touch src/resolvers/resolvers.ts
接著就要來建立我們的 reolvers 了,首先做個簡單的測試,當我們發送 query 是 users 的 request 到我們的 server 時,希望 resolvers 回傳一段文字:’Query of users success!!’ ,這也是為什麼剛剛的 schema 寫成 : users: String 的原因,代表回傳的 response data type 是 string。
// src/resolvers/resolvers.ts
export const resolvers = {
  Query: {
    users: () => `Query of users success!!`
  }
}
2.3 建立 Apollo Server
有了 schema 和 resolvers 後就可以來建立 Apollo Server 了!
// src/server.ts
import * as path from 'path';
import * as fs from 'fs';
import { ApolloServer } from 'apollo-server';

import { resolvers } from './resolvers/resolvers'

const server = new ApolloServer({
  // 用 Node.js 的 fs 和 path 模組 來讀取我們的 schema 檔案
  typeDefs: fs.readFileSync(
    path.join(__dirname, './schema/schema.graphql'),
    'utf8'
  ),
  resolvers,
});

server
  .listen()
  .then(({ url }) => {
    console.log(`Server is running on ${url}`)
  });
接著用 nodemon 執行我們的 server.ts:
npm start2.4 GraphQL playground
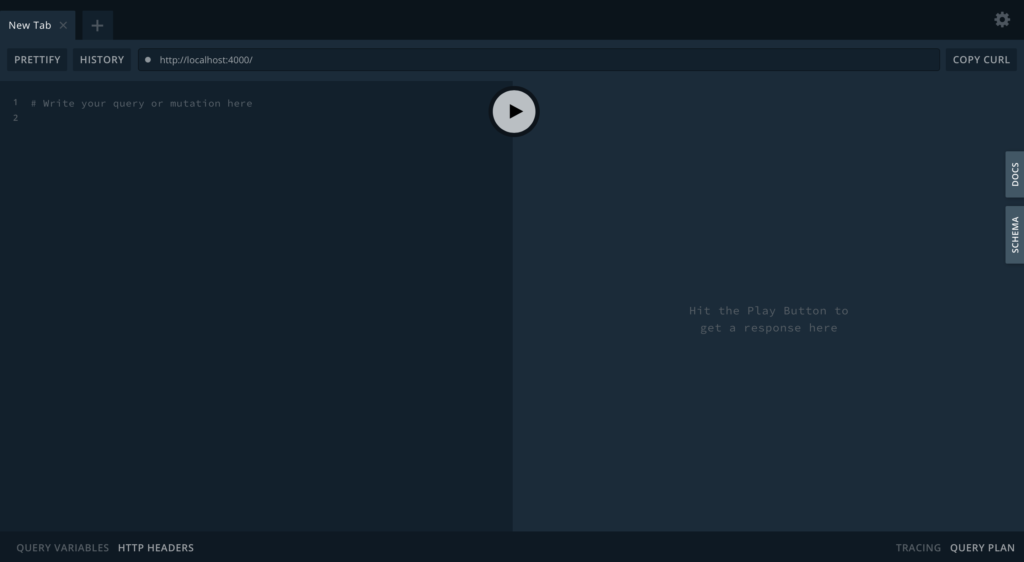
這時候在瀏覽器打開 http://localhost:4000/ 時會有一個 GraphQL playground ,讓你可以直接輸入 query ,模擬有 GraphQL request 傳到 server 時的情況,以及收到的 response。
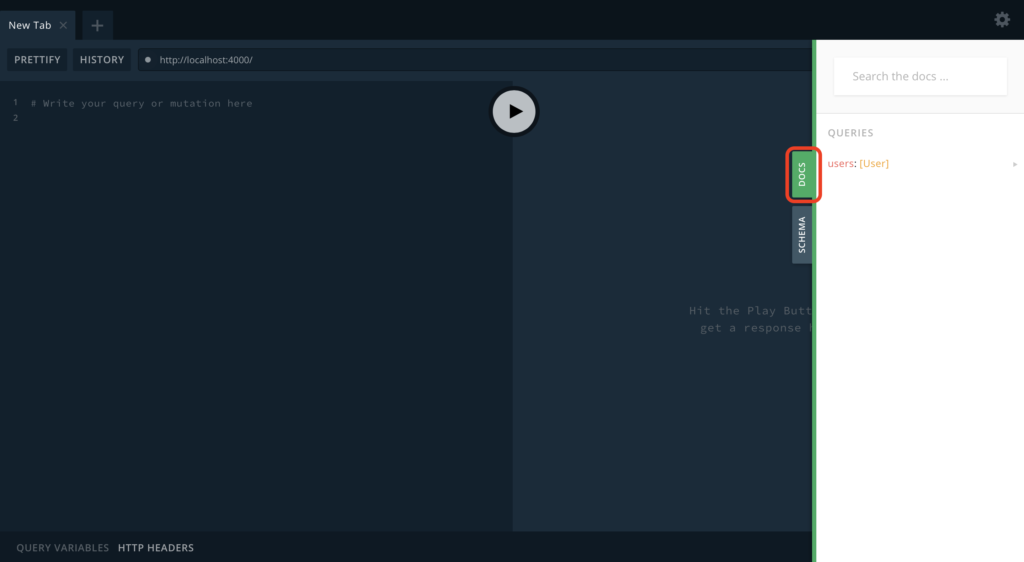
點擊右邊的 DOCS 會出現目前可以 query 的 field ,也就是你目前在 schema.graphql 檔案裡的 field:
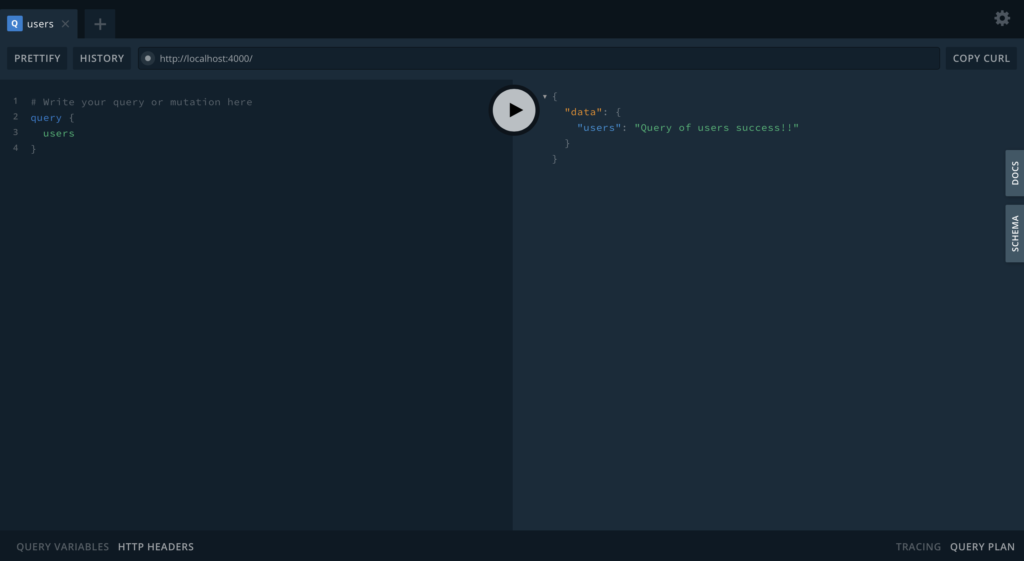
2.5 用 GraphQL playground 測試 request
GraphQL playground 的左側可以輸入 schema 的 field ,按下中間的 play 按鈕就會模擬發送 request 到 server 的情況,右邊則會顯示接收到的 response :
3. 加入 mock data
現在讓我們再更進階一點,讓 Apollo server 幫我們回傳自己建立的假資料。
3.1 修改 schema
因為之後回傳的資料不一樣了,所以也要修改 schema ,確定回傳的資料型別:
# src/schema/schema.graphql
type Query {
  users: [User]
}

type User {
  id: Int
  name: String
  age: Int
}
這樣代表回傳回來的資料會是一個 array ,且 array 裡每一個 element 的 type 都是 User。
3.2 建立 mock data,並修改 resolvers
這邊先直接將 mock data 寫在 resolvers .ts 裡,並且修改 resolvers:
// src/resolvers/resolvers.ts
const users = [
  {
    id: 1,
    name: 'Jimmy1',
    age: 18,
  },
  {
    id: 2,
    name: 'Jimmy2',
    age: 20,
  }
]

export const resolvers = {
  Query: {
    // 一般來說 resolvers 會有 4 個參數,目前還不會用到,之後用到的時候再一一說明
    // 當 query field 有 users 時,回傳 users 陣列
    users: async(parent: any, args: any, context: any, info: any) => {
      return users;
    }
  }
}
3.3 用 GraphQL playground 測試 request
因為我們用 nodemon 在 run 我們的 server.ts ,所以每當有檔案修改時就會自動重 load server.ts 檔,現在回到瀏覽器的 GraphQL playground 重新整理後就可以繼續測試是否有成功修改到 response 回傳的 data:
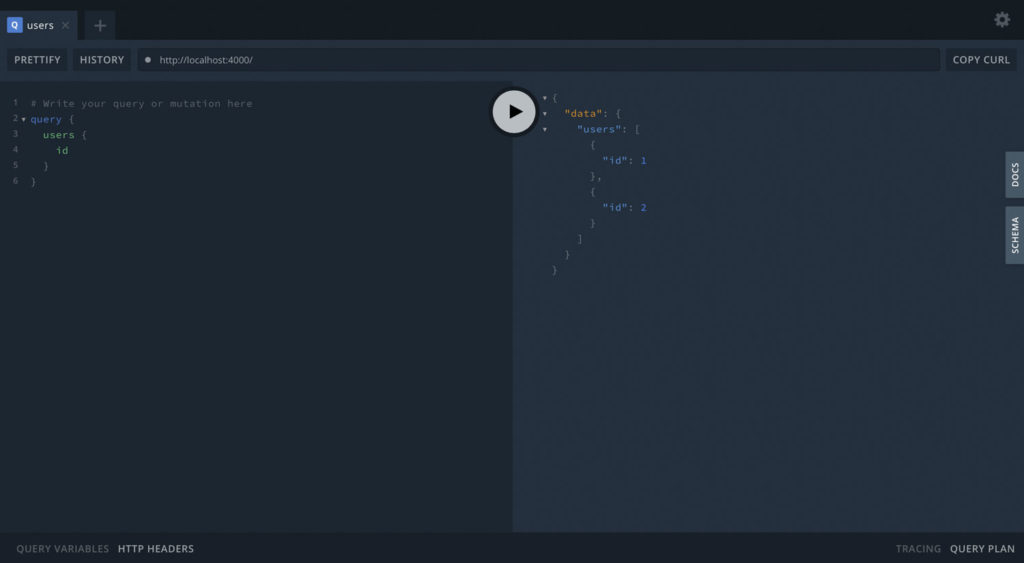
Apollo Server 會根據你寫的 field 回傳不同的資料,假設今天某個頁面只需要 user 的 id 就可以像上面那樣寫,但假設今天某個頁面需要的資料比較完整,就可以寫成下面這樣:
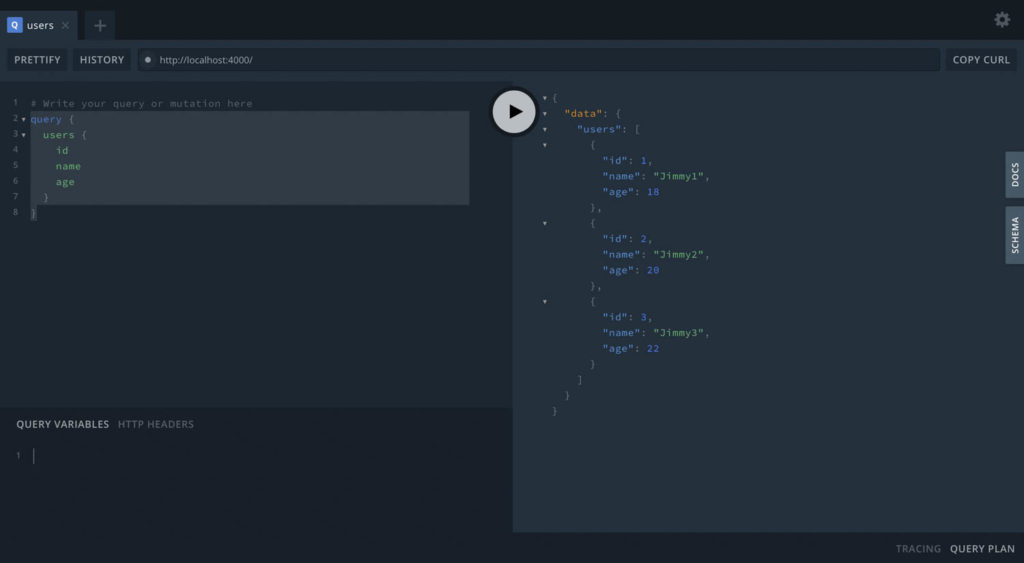
這就是 GraphQL 的好處,根據不同的 query 回傳不同的 data ,讓你的 API 變得非常彈性!
4 在 request 加入變數
有時候我們並不只想回傳全部的資料,還會希望根據 request 的變數來回傳特定的資料,例如:在 request 中放入 id,根據這個 id 找到該 user 的資料。
4.1 新增 schema
這邊要注意的是在 request 要放的變數必須用 input 開頭來指定型別:
# src/schema/schema.graphql
type Query {
  users: [User]
  user(userInput: UserConfig): User
}

type User {
  id: Int
  name: String
  age: Int
}

input UserConfig {
  id: Int
}
4.2 修改 resolvers
這時候會用到 resolvers 的第 2 個參數:args,args 參數就是用來存取 request 裡的變數用的:
// /src/resolvers/resolvers.ts
export const resolvers = {
  Query: {
    users: async(parent: any, args: any, context: any, info: any) => {
      return users;
    },
    user: async(parent: any, args: any, context: any, info: any) => {
      const userId = args.userInput.id;
      return users.find(v => v.id === userId);
    }
  }
}
4.3 用 GraphQL playground 測試 request
GraphQL 的變數可以直接寫在 query field 裡,也可以寫在 playground 的 QUERY VARIABLE 裡,不過兩種寫法不太一樣:
4.3.1 將變數寫在 query field 裡
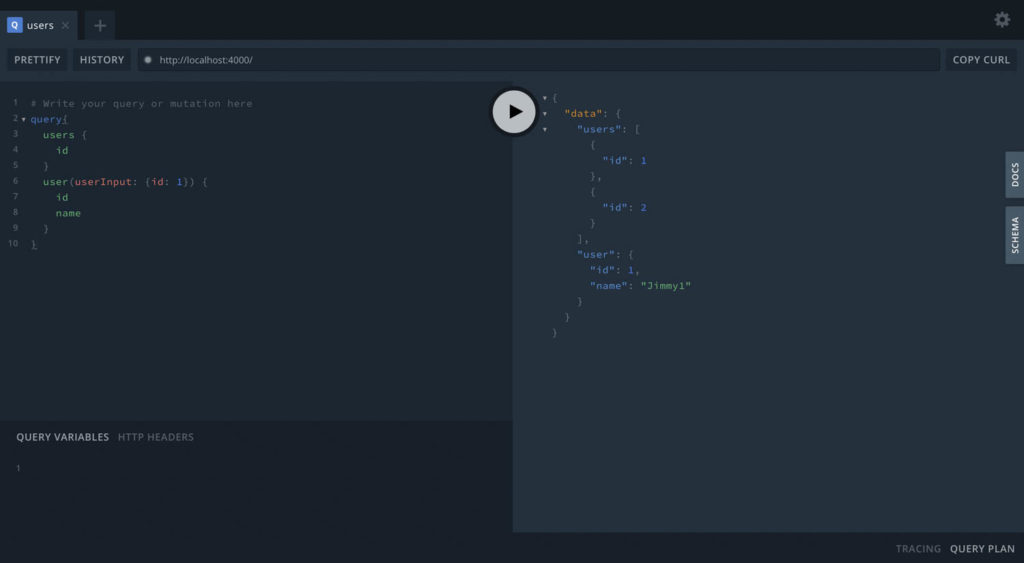
可以看到我們成功拿到 id = 1 的 user 資訊了!這種寫法不需要指定型別,接著來看看另一種寫法:
4.3.2 將變數寫在 playground 的 QUERY VARIABLE 裡
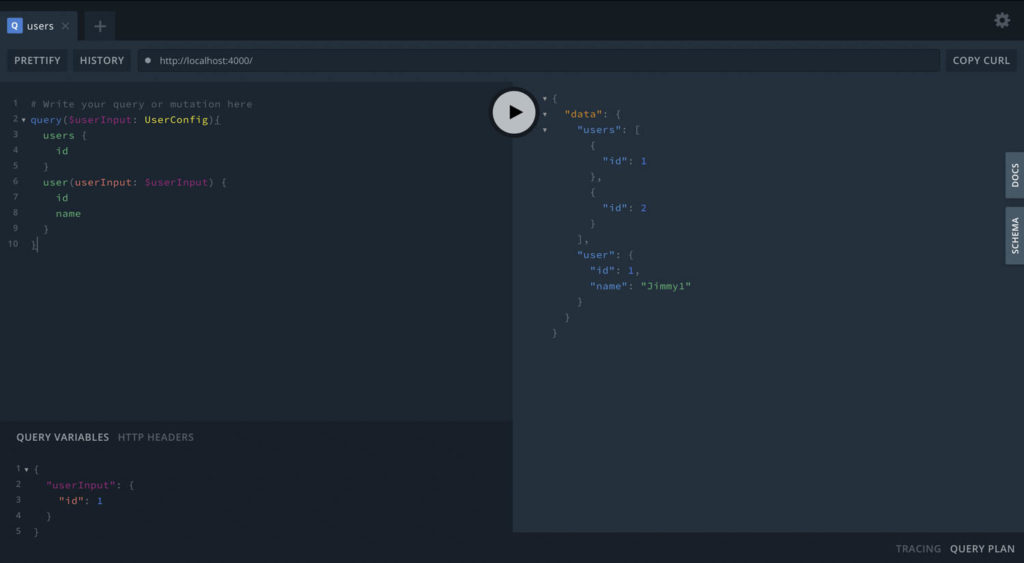
這種寫法要先在 query 裡指定變數的型別 ( 必須和 schema 裡的型別一樣 ) ,在左下角的 QUERY VARIABLE 給該變數賦值,最後再到 query field 裡指定該參數要使用哪個變數。
5. 用 mutation 來對資料做修改
到目前為止我們都是用 query 來發送 request ,當我們要對資料做修改時 ( 新增、修改、刪除 ) ,則需要用到 mutation 這個 field。
5.1 新增 schema
記得剛剛說的:要在 request 放變數時,變數的型別指定必須用 input 開頭,所以新增 schema 如下:
type Mutation {
  createUser(userInput: UserInput): User
}

type User {
  id: Int
  name: String
  age: Int
}

input UserInput {
  id: Int
  name: String
  age: Int
}
5.2 修改 resolvers
直接在 Query 的後面新增 Mutation,利用 args.userInput 後再 push 到目前的陣列中:
// src/resolvers/resolvers.ts
export const resolvers = {
  Query: {
    users: async(parent: any, args: any, context: any, info: any) => {
      return users;
    },
    user: async(parent: any, args: any, context: any, info: any) => {
      const userId = args.userInput.id;
      return users.find(v => v.id === userId);
    }
  },
  Mutation: {
    createUser: async(parent: any, args: any, context: any, info: any) => {
      const user = args.userInput;
      users.push(user);
      return user;
    },
  }
}
5.3 用 GraphQL playground 測試 request
像這種變數比較多欄位的情況就會滿建議將變數寫在 QUERY VARIABLE 裡面,以免 query field 變成一大包:
mutation($userInput: UserInput) {
  createUser(userInput: $userInput) {
    id
    name
    age
  }
}

# QUERY VARIABLES
{
  "userInput": {
    "id": 3,
    "name": "Jimmy3",
    "age": 22
  }
}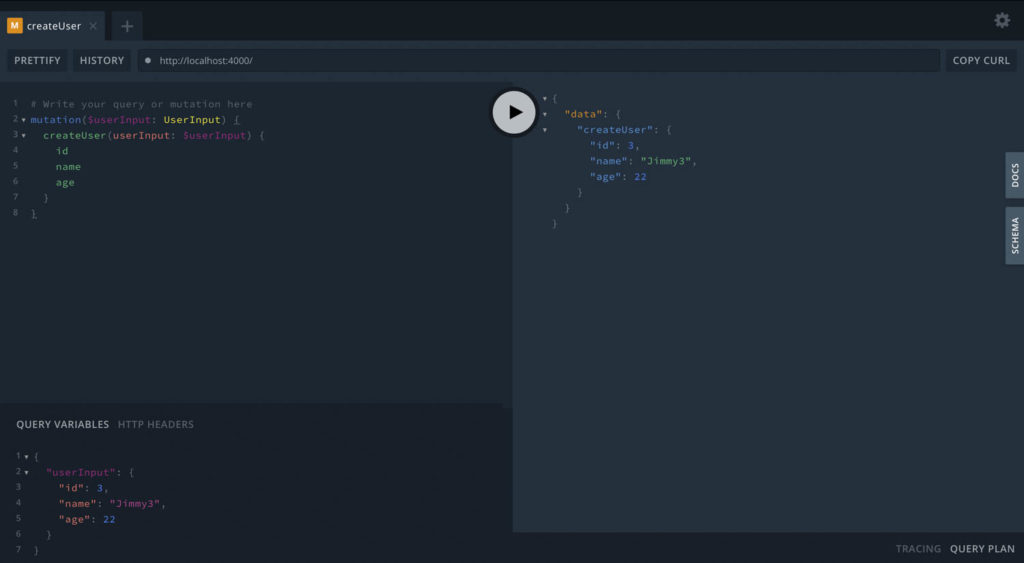
如此一來就成功建立新的 user 了!接著我們用 query 來拿回所有 user ,看是不是真的成功建立新 user:
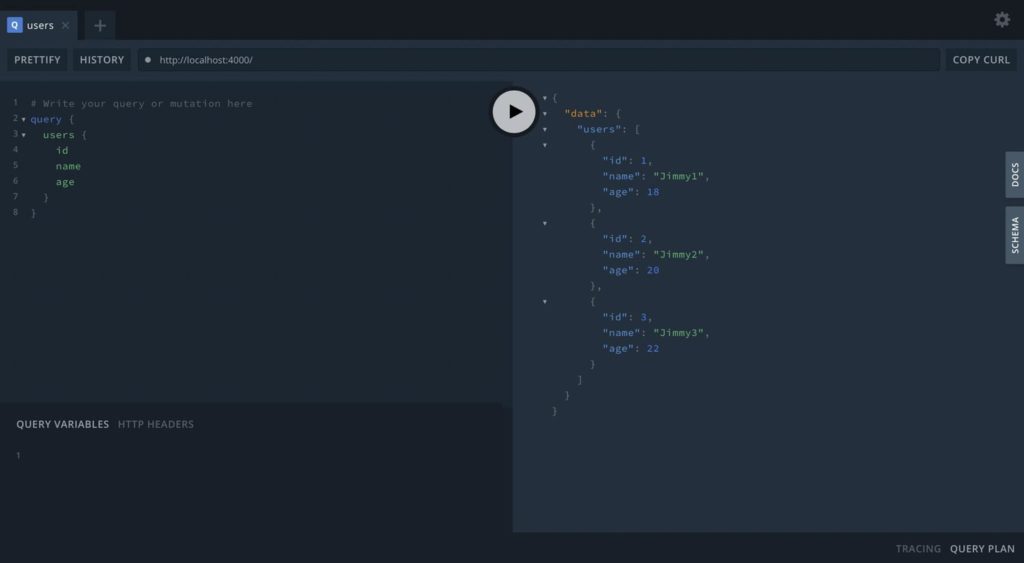
發現多了一個 id = 3 的 user ,代表成功新增了!
5.4 新增 updateUser 和 deleteUser
以下提供我的 code 給大家參考:
# src/schema/schems.graphql
type Query {
  users: [User]
  user(userInput: UserConfig): User
}

type Mutation {
  createUser(userInput: UserInput): User
  updateUser(userInput: UserInput): User
  deleteUser(userConfig: UserConfig): User
}

type User {
  id: Int
  name: String
  age: Int
}

input UserInput {
  id: Int
  name: String
  age: Int
}

input UserConfig {
  id: Int
}
// src/resolvers/resolvers.ts
export const resolvers = {
Query: {
users: async(parent: any, args: any, context: any, info: any) => {
return users;
},
user: async(parent: any, args: any, context: any, info: any) => {
const userId = args.userInput.id;
return users.find(v => v.id === userId);
}
},
Mutation: {
createUser: async(parent: any, args: any, context: any, info: any) => {
const user = args.userInput;
users.push(user);
return user;
},
updateUser: async(parent: any, args: any, context: any, info: any) => {
const updatedUser = args.userInput;
const updatedUserIndex = users.findIndex((user) => user.id === updatedUser.id);
users[updatedUserIndex] = updatedUser;
return updatedUser;
},
deleteUser: async(parent: any, args: any, context: any, info: any) => {
const deletedUserId = args.userConfig.id;
const deletedUserIndex = users.findIndex((user) => user.id === deletedUserId);
const deletedUser = users.find((u, i) => i === deletedUserIndex);
users.splice(deletedUserIndex, 1);
return deletedUser;
},
}
}6. 參考資料
The Fullstack Tutorial for GraphQL
如果覺得我的文章有幫助的話,歡迎幫我的粉專按讚哦~謝謝你!


